Adding Columns to CDS Tables
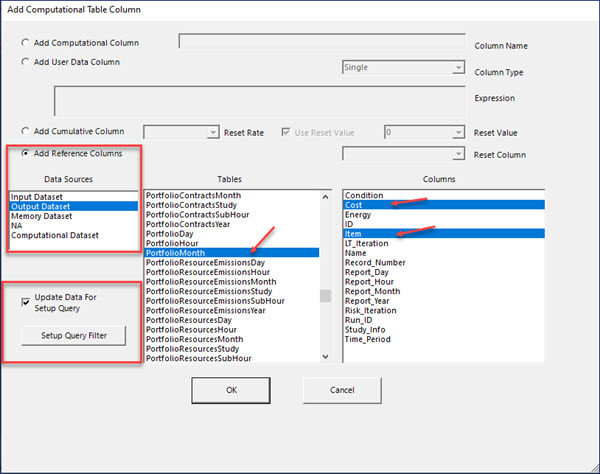
To add a column to an existing CDS Table, first click Add Column on the toolbar. The following dialog box will appear:
Next, specify the type of column to add:
-
Select Add Computational Column if you wish to add a column that contains Expressions.
-
Select Add User Data Column if you wish to add a column where data can be input manually or pasted in from another application (e.g., Microsoft Excel).
-
Select Add Cumulative Column if you wish to add a column that accumulates data.
-
Select Add Reference Column if you wish to add a column that references data in the Input, Output, or Memory tables, or another CDS table. Reference columns can also be filtered using Select Query Filter.
![]() NOTE: If adding an ID column, it cannot be a computational column nor contain an expression. The ID column in a CDS table is a primary key and must be unique.
NOTE: If adding an ID column, it cannot be a computational column nor contain an expression. The ID column in a CDS table is a primary key and must be unique.
Adding a Computational Column
Computational columns are used to perform user-defined calculations based upon any of the other columns in the CDS table. When Add Computational Column is selected, enter the desired name of the new column in the Column Name input field. Then select Column Type. Next, input the desired expression in the Expression dialog box.
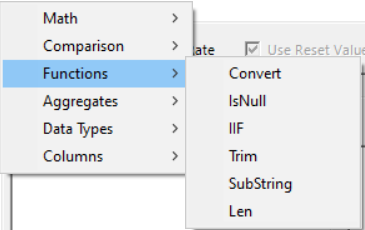
A right-click within the Expression field will bring up a list of available functions and available columns that can be used in the computational expression (see image below). Users may either type in the desired expression or use the right-click menu to auto-populate the desired expression. See Using Expressions for more information.
Concatenation of fields or strings of data can be accomplished using the + operator. For example, to convert a record in TA_START from 20130722 to 07/22/2013 the column expression would need to look like this:
substring(TA_START,5,2) + '/' + substring(TA_START,7,2) +'/'+Substring(TA_Start,1,4)
After entering desired expression, click OK. The new column with computation will appear in the table. Computational columns can be easily recognized by the pale yellow background and blue text.
Adding a User Data Column
User Data columns are used to manually input data into the CDS table. These columns can then be referenced by other columns in the CDS or by input tables. If Add User Data Column is selected, enter the desired name of the new column in the Column Name input field. Then select the Column Type and click OK. Data can then be manually entered or pasted into the new column by the user. User Data columns can be easily recognized by the light blue background and black text.
Adding a Cumulative Column
Cumulative columns are used during a simulation to keep a running total of changing hourly values in some reference column. This total will be cumulated hourly in the CDS based on what is happening during the run. If Add Cumulative Column is selected, enter the desired name of the new column in the Column Name input field. Next select the Column Type. Since this column will be used to accumulate data, the column type should be either Integer or Single.

Select a Reset Rate from the dropdown menu. This will determine at what point the cumulation will be reset. Options include:
-
Start - resets at the start of a study only.
-
Hourly - resets every hour selected in the study.
-
Daily - resets at the start of each day.
-
Weekly - resets at the start of each week.
-
Monthly - resets at the start of each month.
-
Yearly - resets at the start of each year.
-
Study - resets at the completion of the study.
-
Never - will never reset during the study.
If the Use Reset Value box is checked then you may enter a value in the Reset Value box. The cumulation will reset to this value based on the selection from the Reset Rate box (described above). If the Use Reset Value box is not checked, an existing column from the current CDS table can be specified in the Reset Column dropdown menu to specify the reset value. This allows the reset value to be influenced by expressions and user data.
A Reference Column must also be selected. This column may be selected from any dataset and will be used to determine the increment for the cumulation. If a reference column is not selected, the cumulative column will not be created. During a run, each cell in the cumulative column will add the hourly values found in the corresponding cell of the Reference Column to a running total updated hourly. The column will continue to cumulate until it is reset to the Reset Value or the values in the Reset Column at the time horizon specified in the Reset Rate dropdown. For the Cumulative column to work in a CDS table during a run, the Input Refresh Frequency must be set to Hourly or Pre-Hourly for that table and the Use for Input checkbox must be selected.
Adding a Reference Column
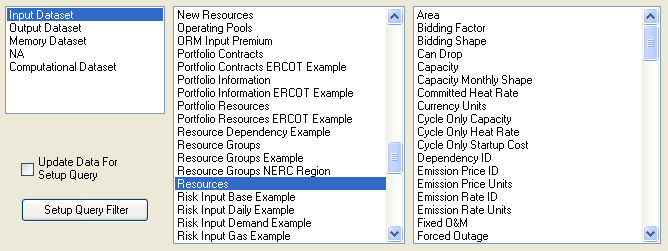
Reference columns are used to bring in data from Input, Output, Memory, or other CDS tables. If Add Reference Column is selected, specify the location of the desired column. This will populate the left-hand dialog box with the list of tables. For example, if Input Dataset is selected, all available input tables will appear in the first dialog box, as shown below.
Next, select the data table for the desired column. The right-hand dialog will populate with the existing columns in that table. For example, if the Resources table is selected in the left-hand dialog box the right-hand dialog box will display all columns in the Resources table, as shown below. Select the desired column.
![]() NOTE: If a referenced column is to be used as input, it is highly recommended that Custom Memory Tables be created and referenced instead of Memory Tables. Access to a large Memory Table through a CDS during a run will significantly slow down run time.
NOTE: If a referenced column is to be used as input, it is highly recommended that Custom Memory Tables be created and referenced instead of Memory Tables. Access to a large Memory Table through a CDS during a run will significantly slow down run time.
Applying Filters to Reference Columns
To apply a Query Filter on the referenced dataset table select the Update Data for Setup Query switch, then click the Setup Query Filter button. Use this feature to select a filtered subset of data, rather than all the data from the referenced column. When the Setup Query Filter button is pressed, the standard Custom Filter dialog box will open (below).
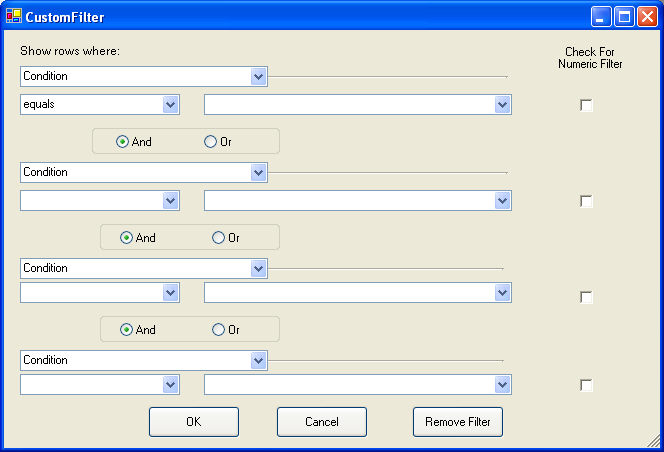
Apply the Query Filter as desired then select OK.
Click OK on the Add Column window. The selected column will appear in the active Computational Dataset table.
![]() Adding Columns to CDS Tables
Adding Columns to CDS Tables